#
Page Summary #
This wiki page explains how to use the QCreaser creasing machine, including product details, machine specifications, safety precautions, components, installation, control panel functions, data storage, calibration, tool installation, common problems, and maintenance.
Index #
- Product Introduction
- Machine Size and Parameters
- Safety Precautions
- Main Components
- First Installation
- Machine Control
- Operation Panel Introduction
- Main Menu
- Mode Interface
- Creasing Function
- Data Storage
- Sizer Calibration
- Creasing Skew Adjustment
- Creasing Depth Adjustment
- Tool Installation
- Cover Function
- Progressive Creasing
- Variable Creasing
- Common Problems
- Maintenance
- Attention
- Support Details
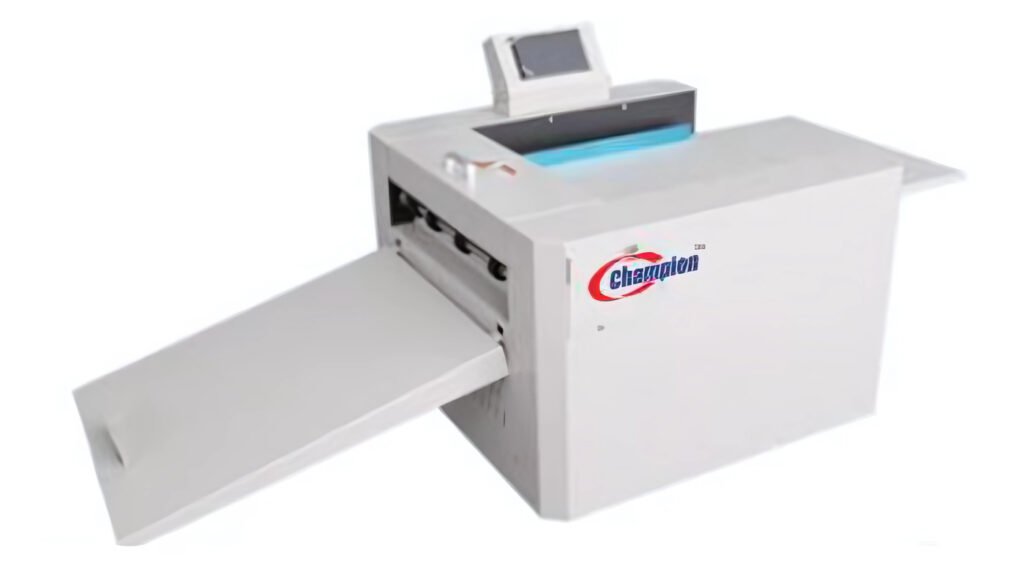
1. Product Introduction #
Thank you for choosing the QCreaser digital creasing machine.
Please read this operation guide carefully before using the machine. Understanding each operating detail will help you use the machine correctly, achieve better production results, and improve work efficiency.
The QCreaser is designed with digital control for accurate processing positions. It supports two production functions: creasing and dotted line processing.
Key Capabilities #
- Digital control processing positions
- Creasing and dotted line functions
- Processing width up to 340 mm
- Suitable paper thickness from 100 to 350 gsm for creasing
- Suitable paper thickness from 100 to 200 gsm for dotted line processing
- Paper length up to 660 mm
- Up to 32 creasing tracks
2. Machine Size and Parameters #
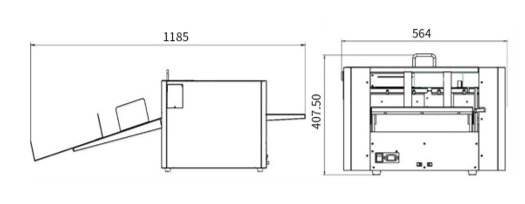
Parameters #
| Item | Specification |
|---|---|
| Max Paper Size | 340 x 470 mm |
| Minimum Paper Size | 50 x 90 mm |
| Type of Paper | Coated paper, laminated paper, UV coating paper, etc. |
| Working Accuracy | 0.3 mm |
| Working Speed | 2400 sheets/hour, based on one A4 sheet |
| Max Number of Creasing Tracks | 32 groups |
| Paper Feeding | By hand |
| Thickness of Creasing Paper | 100 to 350 gsm |
| Thickness of Dotted Line Paper | 100 to 200 gsm |
| Power | 150 W |
| Voltage | 220 V / 50 Hz or 110 V / 60 Hz |
| Weight | Gross weight 43 kg |
3. Safety Precautions #
3.1 Working Environment #
- Operating temperature: 10°C to 35°C
- Keep the machine away from combustible materials, corrosive gases, oil mist, fire, and liquids.
- Place the machine on a stable and safe surface.
3.2 Precautions Before and During Use #
- Read this manual carefully before operation.
- Ensure that the power supply voltage and frequency match the machine requirements.
- Ensure that all safety covers are closed. The machine will not operate if the covers are not properly placed.
- Disconnect all power before cleaning the machine.
- Disconnect the power when the machine will not be used for a long time.
- Do not install or operate the machine on an uneven or unstable surface.
- Do not operate the machine with wet hands, especially when touching power cords.
- Operators should not keep long hair loose or wear loose clothing while operating the machine.
- Do not touch internal moving parts with fingers.
- Do not place containers with liquid on the machine.
- Do not place small items on the machine, as they may fall inside and cause damage.
- Do not modify or disassemble the machine without authorisation.
- Do not touch any operating parts while the machine is running.
- Avoid suddenly cutting power while the machine is running.
- Do not allow metal or combustible objects to enter the machine. This can create a risk of fire or electric shock.
- If an abnormal condition occurs, turn off the power immediately, unplug the power cord, and contact a technician.
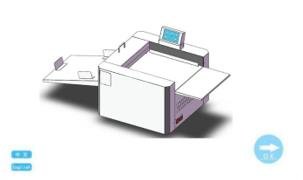
4. Main Components #
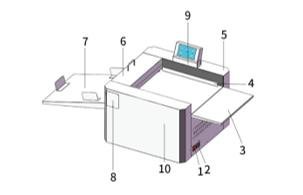
| No. | Component Name | Description |
|---|---|---|
| 1 | Power Switch | Turns the machine power supply on and off. |
| 2 | Power Outlet | Supplies power to the machine. |
| 3 | Paper Extension Board | Used when processing long paper. |
| 4 | Paper Feeding Guide | Guides paper feeding and helps with skew adjustment. |
| 5 | Right Cover | Protects internal parts and improves operator safety. |
| 6 | Upper Cover Shell | Isolates operating parts. The machine cannot run if this cover is not correctly placed. |
| 7 | Paper Receiving Table | Receives processed paper. |
| 8 | Cover for Tool Change | Isolates moving parts when closed and allows tool replacement when opened. |
| 9 | Computer Screen | Used to operate the machine. |
| 10 | Left Cover | Protects internal parts and improves operator safety. |
5. First Installation #
- Unpack the machine.
- Place the main unit on a flat and stable workbench.
- Hang the paper feed extension board on the three hooks on the paper input side.
- Hang the receiving board on the three hooks on the paper output side.
- Adjust the paper stop gauge to the appropriate position according to the size of the material being processed.
6. Machine Control #
6.1 Operation Panel Introduction #
Click the OK button in the lower right corner to move to the next interface.
6.2 Main Menu #

Click OK to enter the main menu.
From the main menu, click the MODE button.
6.3 Mode Interface #

Select the required function and start using the machine.
Available functions include:
- Creasing Function
- Cover Function
- Progressive Creasing
- Variable Creasing
6.4 Creasing Function #
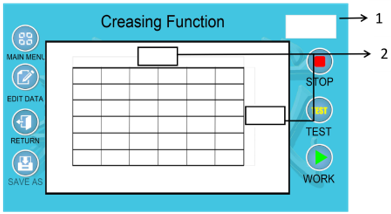
Function Notes #
- Paper Pass / Preset Quantity Display
The display shows the number of sheets processed and the preset quantity, for example 0/999.
When the number of processed sheets reaches the preset quantity, the machine pauses automatically. Press the relevant position to set the default quantity, then press the confirm key.
- Paper Length and Width Input
Enter the paper length and width to help determine the creasing position.
6.5 Data Storage #
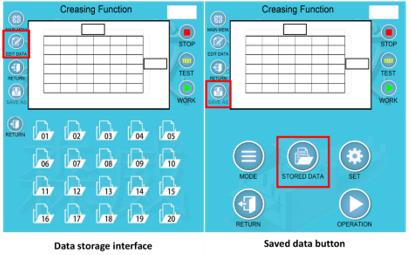
When the machine starts, it uses the data from the last run by default.
To view or edit the data:
- Press Edit on the run interface.
- Press Run or Test to run the machine according to the set programme.
- To save the data, press Edit on the run interface.
- Enter the required data.
- Press Save As to enter the data storage interface.
- Save the data.
The machine can store up to 20 sets of data at the same time.
To use saved data, select the saved data group from Saved Data on the home page.
6.6 Sizer Calibration #

When using paper of different thicknesses, or when changing between the creasing knife and dotted line knife, a slight size deviation may occur. Use this function to adjust product accuracy.
Head Length #
Adjusts the distance when the paper is first creased.
If the creasing size is larger than the set size, reduce the head length value. Reducing the value by one is equivalent to shortening the creasing size by 0.1 mm.
Proportion #
Adjusts the distance between each crease when multiple creases are applied.
If the distance between creases is greater than the set size, increase the proportion value. Increasing the value by one makes the centre size of the crease 0.1 mm shorter.
6.7 Creasing Skew Adjustment #
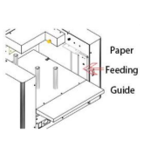
If the crease is not vertical or appears skewed, adjust the paper feeding guide to change the feeding angle.
The paper feeding guide controls the paper feeding direction and can be adjusted. It is fixed to the feed tray using two screws. Slightly adjust the guide angle according to the skew direction.
As the feeding direction changes, the crease angle also changes. This helps compensate for the original skew.
6.8 Creasing Depth Adjustment #
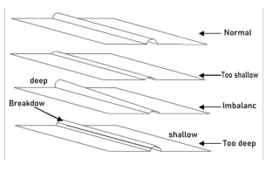
The creasing depth depends on the gap between the upper and lower racks and the thickness of the paper.
- If the gap is too large, the crease may not be clear.
- If the gap is too small, the paper may crack or get damaged.
- If the depth is uneven on both sides, adjustment is required.
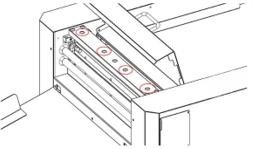
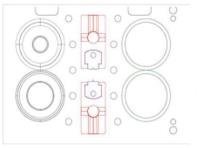
Adjustment Method #
- Open the safety cover as shown in the diagram.
- Use the four screws indicated by the arrows to adjust the creasing depth.
- Turn the screw clockwise to decrease the depth.
- Turn the screw counterclockwise to increase the depth.
- Fine tune the depth carefully before running the actual job.
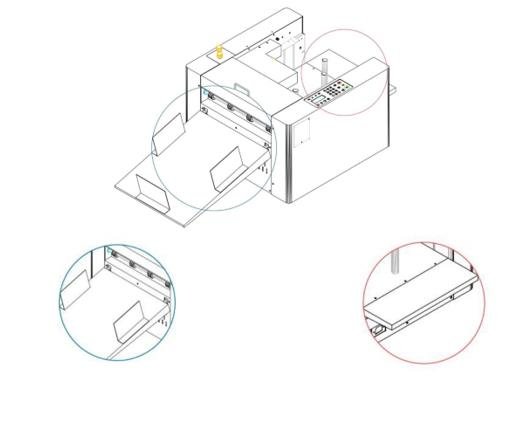
6.9 Tool Installation #
Installation of Creasing Knife #
- Open the small cover for tool replacement.
- Install the tool with the groove in the upper tool housing.
- Install the tool with the tip into the lower tool housing.
Installation of Dotted Line Knife #
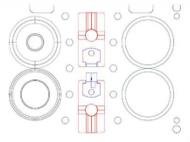
- Open the small cover for tool replacement.
- Install the tool with the rubber pad into the upper tool mould.
- Install the sponge-coated tool into the lower blade housing.
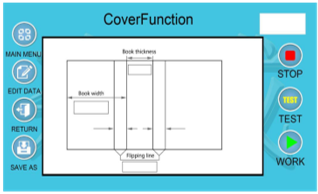
6.10 Cover Function #
Book Width #
Enter the required book width using the numeric keys. Press the confirm key after input.
Book Thickness #
Enter the value according to the thickness of the inner pages of the finished product. Press the confirm key after input.
Flipping Line #
Enter the turning line size according to the job requirement. Press the confirm key after input.
After all values are set, press the Run key or Test key to run the machine.
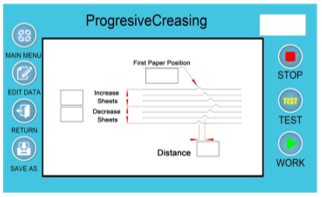
6.11 Progressive Creasing #
Use the Set button in the main menu, enter the code, and press the confirm button to enter size calibration. The starting data is the factory-adjusted data.
First Paper Position #
Sets the starting point of the first crease. Press the confirm key after input.
Increase Sheets #
Enter the number of sheets according to the required increase in paper quantity. Press the confirm key after input.
Decrease Sheets #
Enter the number of sheets according to the required reduction in paper quantity. Press the confirm key after input.
Distance #
Enter the required spacing between adjacent crease lines. Press the confirm key after input.
After all values are set, press the Run key or Test key to run the machine.
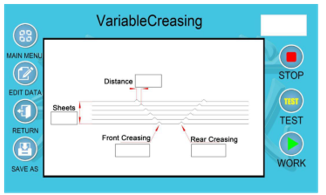
6.12 Variable Creasing #
Sheets #
Enter the number of sheets required to set the square spine mode. Press the confirm key after input.
Front Creasing #
Enter the required front crease position. Press the confirm key after input.
Rear Creasing #
Enter the required rear crease position. Press the confirm key after input.
Distance #
Enter the required distance between the two crease lines. Press the confirm key after input.
After all values are set, press the Run key or Test key to run the machine.
7. Common Problems #


7.1 Motor Failure #
Possible causes:
- Too many sheets of paper entered at one time.
- The tool is installed too low.
- The processing paper is too thick.
7.2 Paper Jam Fault #
Possible causes:
- The paper is too thin or wrinkled.
- There is debris on the paper path.
- The paper is curled or the creasing knife is set too low.
Solution #
- Carefully use the direction buttons on the panel interface while assisting by hand to remove the paper.
- After removing the paper, adjust the creasing tool if the fault was caused by incorrect tool installation.
- After troubleshooting, click the Fault Clear button.
- If the issue continues, contact a professional technician.
Important: Do not pull the paper hard. This may damage the paper feed roller and motor.
7.3 Foaming of Laminated Paper #
When creasing laminated paper, the crease may detach from the film and create bubbles.
Solution #
- Make the creasing shallower.
- Use a better quality film.
8. Maintenance #
Maintenance is essential for extending the life of the machine and improving operating efficiency.
Maintenance includes two main areas:
- User maintenance
- Technical maintenance
8.1 User Maintenance #
When the machine is used for a long time, dust or paper dust may accumulate between mechanical components and affect machine performance.
Operators should regularly clean paper scraps and dust inside the machine. A practical cleaning interval is after every 4,000 to 5,000 sheets produced.
Rubber rollers and display screens should be cleaned regularly with alcohol.
Also make sure that:
- The working environment is dry and clean.
- The machine is not exposed to direct bright light.
8.2 Technical Maintenance #
Regular technical support is also important and should be carried out by qualified technical personnel.
Technical maintenance includes:
- Regular inspection of the machine
- Checking for damaged parts
- Replacing damaged parts
- Adding lubricant where required
9. Attention #
- Read this operation manual carefully before using the machine.
- Keep the machine away from children.
- Keep the machine away from fire and liquid.
- Put the machine on a stable and safe surface to prevent it from falling or causing injury to people or damage to the machine.
- Take a trial with the same substrate before proceeding with the actual job to achieve a better result on the first attempt.
10. Support Details #
Spare parts and service support are available.
Visit the website for the consumables list.
Website: www.cutnbind.com
Email: sales@cutnbind.com


